How to Make Your Own DIY Acoustic Panels
DIY Acoustic Panels
Sick of fighting muddy mixes, distracting echoes, or just plain bad sound in your room? Acoustic treatment is often the answer, but professional panels can carry a hefty price tag. The good news? You can achieve significant sonic improvements by building your own acoustic panels! It’s a rewarding DIY project that saves you money and lets you customize the look to fit your space perfectly.
This guide will walk you through constructing high-performance, fabric-wrapped acoustic panels using readily available materials.
Before You Start: Safety is Key!
Working with wood and insulation requires precautions:
- Always wear safety glasses to protect from sawdust and debris.
- Use work gloves, especially when handling insulation materials like mineral wool or fiberglass.
- A dust mask is essential when cutting wood and insulation to avoid inhaling particles.
- Work in a well-ventilated space.
- Know how to use your tools safely.
DIY Acoustic Panels
Gather Your Supplies (Materials List):
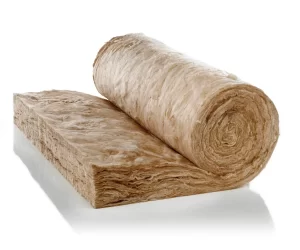
- Insulation Core: This does the heavy lifting of sound absorption. You’ll want dense, board-like insulation. Great options include:
- Mineral Wool: Brands like Rockwool (e.g., Safe’n’Sound or Rockboard) are popular choices. Look for density ratings around 3-8 lb/ft³.
- Rigid Fiberglass: Products like Owens Corning 703 or 705 are industry standards. (Handle fiberglass with extra care – long sleeves recommended).
- Thickness: 2 inches (5cm) is good, but 4 inches (10cm) is generally better for absorbing lower frequencies.
- Quantity: Depends on panel size (2ft x 4ft is common) and how many you need.
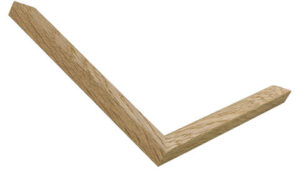
- Lumber for Frames: Common, affordable wood like 1×4 inch pine or fir boards works perfectly. Calculate the total length needed based on the perimeter of all your planned panels.
- Breathable Fabric: This is crucial! The fabric must allow sound waves to pass through to the insulation.
- Good choices: Burlap, muslin, duck canvas, or purpose-made acoustic fabrics (like Guilford of Maine, often mentioned in guides).
- Bad choices: Vinyl, thick polyester, plastic-coated fabrics – anything that reflects sound or doesn’t let air pass easily. Test: Hold it to your mouth; you should be able to breathe through it without much resistance.
- Quantity: Enough to cover the front and wrap around the back edges by several inches (4-6 inches / 10-15cm).
- Wood Screws: To assemble the frames (e.g., 1.5 – 2 inches long).
- Heavy-Duty Staples: For attaching the fabric (around 1/2 inch or 10-12mm).
- (Optional) Backing Fabric: A very thin, breathable fabric like basic cotton, muslin, or landscape weed barrier can be stapled to the back of the frame before the main fabric wrap to neatly contain the insulation.
DIY Acoustic Panels
Essential Toolkit:
- Measuring Tape & Pencil
- Saw (Miter saw is great for clean cuts, but a circular saw or even a hand saw works)
- Drill/Driver (for pilot holes and screws)
- Heavy-Duty Staple Gun (manual or powered)
- Utility Knife or Serrated Knife (for cutting insulation)
- Carpenter’s Square or Speed Square (for square frames)
- Safety Gear (Glasses, Gloves, Mask)
- Clean work surface
Building Your Acoustic Panels: Step-by-Step
Step 1: Construct the Frames
- Measure and cut your lumber. For simple, sturdy frames, use butt joints. For a 2ft x 4ft panel using 1x4s (which are actually ~0.75 inches thick):
- Cut two pieces at 48 inches.
- Cut two pieces at 24 inches minus twice the wood thickness (24″ – 1.5″ = 22.5 inches).
- Assemble the rectangle using wood screws. Drill pilot holes near the ends of the boards to prevent splitting. Use your square to ensure the corners are 90 degrees.
Step 2: Cut the Insulation
- Measure your insulation slab to fit inside the frame snugly.
- Wearing your gloves and mask, carefully cut the insulation using the utility knife or serrated knife against a straight edge. Do this on a surface you don’t mind potentially scratching.
Step 3: Assemble Panel Core
- Place the cut insulation slab into the wooden frame. It should fit securely.
- (Optional) If using backing fabric, lay it flat, place the frame/insulation onto it (back side down), pull taut, and staple the backing fabric to the back of the frame.
Step 4: Wrap with Fabric
- Lay your main decorative fabric face down on your clean work surface, smoothing out wrinkles.
- Center the panel frame (insulation/backing side down) onto the fabric.
- Start with one long side: Fold the fabric over the back edge of the frame. Pull it taut (firm but not distorting the frame) and place a few staples in the center of the wood edge.
- Move to the opposite long side: Pull the fabric evenly taut and staple in the center.
- Work your way out from the center towards the corners on both long sides, adding staples every few inches. Keep the tension even.
- Tackle the short sides: Neatly fold the corners (like wrapping a gift or making “hospital corners”). Fold the excess fabric smoothly, pull taut, and staple securely.
- Ensure the front face of the panel looks smooth and wrinkle-free. Add more staples as needed on the back for security.
Step 5: Finishing Touches
- Trim any excessive fabric overlap on the back for a cleaner look.
DIY Acoustic Panels
Mounting and Placing Your Panels
Hanging: Common methods include heavy-duty picture wire screwed into the back of the frame or using Z-clips or French cleats for a flush, secure mount.
Air Gap: Consider mounting panels with a 1-4 inch gap behind them (using wood blocks or offset hardware). This small air gap significantly improves low-frequency absorption efficiency.
Placement is Key: Don’t just stick panels randomly!
* First Reflection Points: Sit in your primary listening position (your “sweet spot”). Have a friend slide a mirror along the side walls, ceiling, and the wall behind your speakers. Any location where you can see your speakers in the mirror is a first reflection point – prioritize placing panels here.
* Corners: Corners are notorious for bass frequency buildup. Placing panels across corners (straddling the corner) or using thicker panels specifically built as “bass traps” is highly effective for taming low-end boominess.
* Back Wall: The wall behind you can cause problematic reflections. Placing panels here can tighten up the sound.
Enjoy Your Transformed Sound!
Building your own DIY acoustic panels takes some effort, but the payoff in improved sound clarity and reduced echo is well worth it. You’ve saved money, customized the look, and gained valuable control over your room’s acoustics. Whether for music production, home theater, or just a more peaceful space, enjoy the difference your hand-built panels make!


